Saturday 28 January 2012

Venus de Milo

I've had a lot of fun this week in the studio. One of the challenges that came up two weeks ago in my Tuesday morning painting group was to paint the statue Venus de Milo using acrylic paint and including newspaper collage.


I had a painting on a 30" x 36" gallery canvas that no longer pleased me so I set to work covering up the existing painting and creating a background for "Venus".  I decided to leave a lot of the background to make up the statue adding some darker and lighter areas to give her some form.  I like the loose feeling of this painting and how the subject meshes with the background.


I hauled Venus to the Tuesday morning group last week; no easy task since I walk there and the winds last Tuesday were fierce.  A large format canvas can become quite a challenge on a windy January day! Never-the-less she and I both survived the trek.  Venus even survived the mid-morning "critique" period when everyone gets a chance to put in their two-cents about what the others are painting.  All it all it was a great week.

Thank you for stopping by My Turquoise Kettle Life today.

May you have a simply beautiful day,

Sandra

Friday 20 January 2012

How to Create a Vision Board

In December (Dec.11, 2011) I promised that I would share with you the process of creating a new vision board. A vision board is a board on which you post images and sometimes words of the life that you are wishing to create for yourself. The basic concept is that by focusing your thoughts/attention on what you desire, you actually manifest those things/situations in your life. We can do this by focusing our thoughts on our goals and desires (think of the book The Secret), by using positive affirmations and by visualizing ourselves in the desired situations. Apparently our brains work well with thoughts and words, but they work amazingly well when given an image to focus on.


This is where the vision board comes in. By creating a collage or board of images of the things that you desire to manifest in your life and by posting this board in a location where you will see it daily (mine hangs over my desk in my home office) you will consciously and subconsciously be absorbing and focusing on the images that you have chosen. This focused attention sets in motion your thoughts which attract these things/situations into your life.


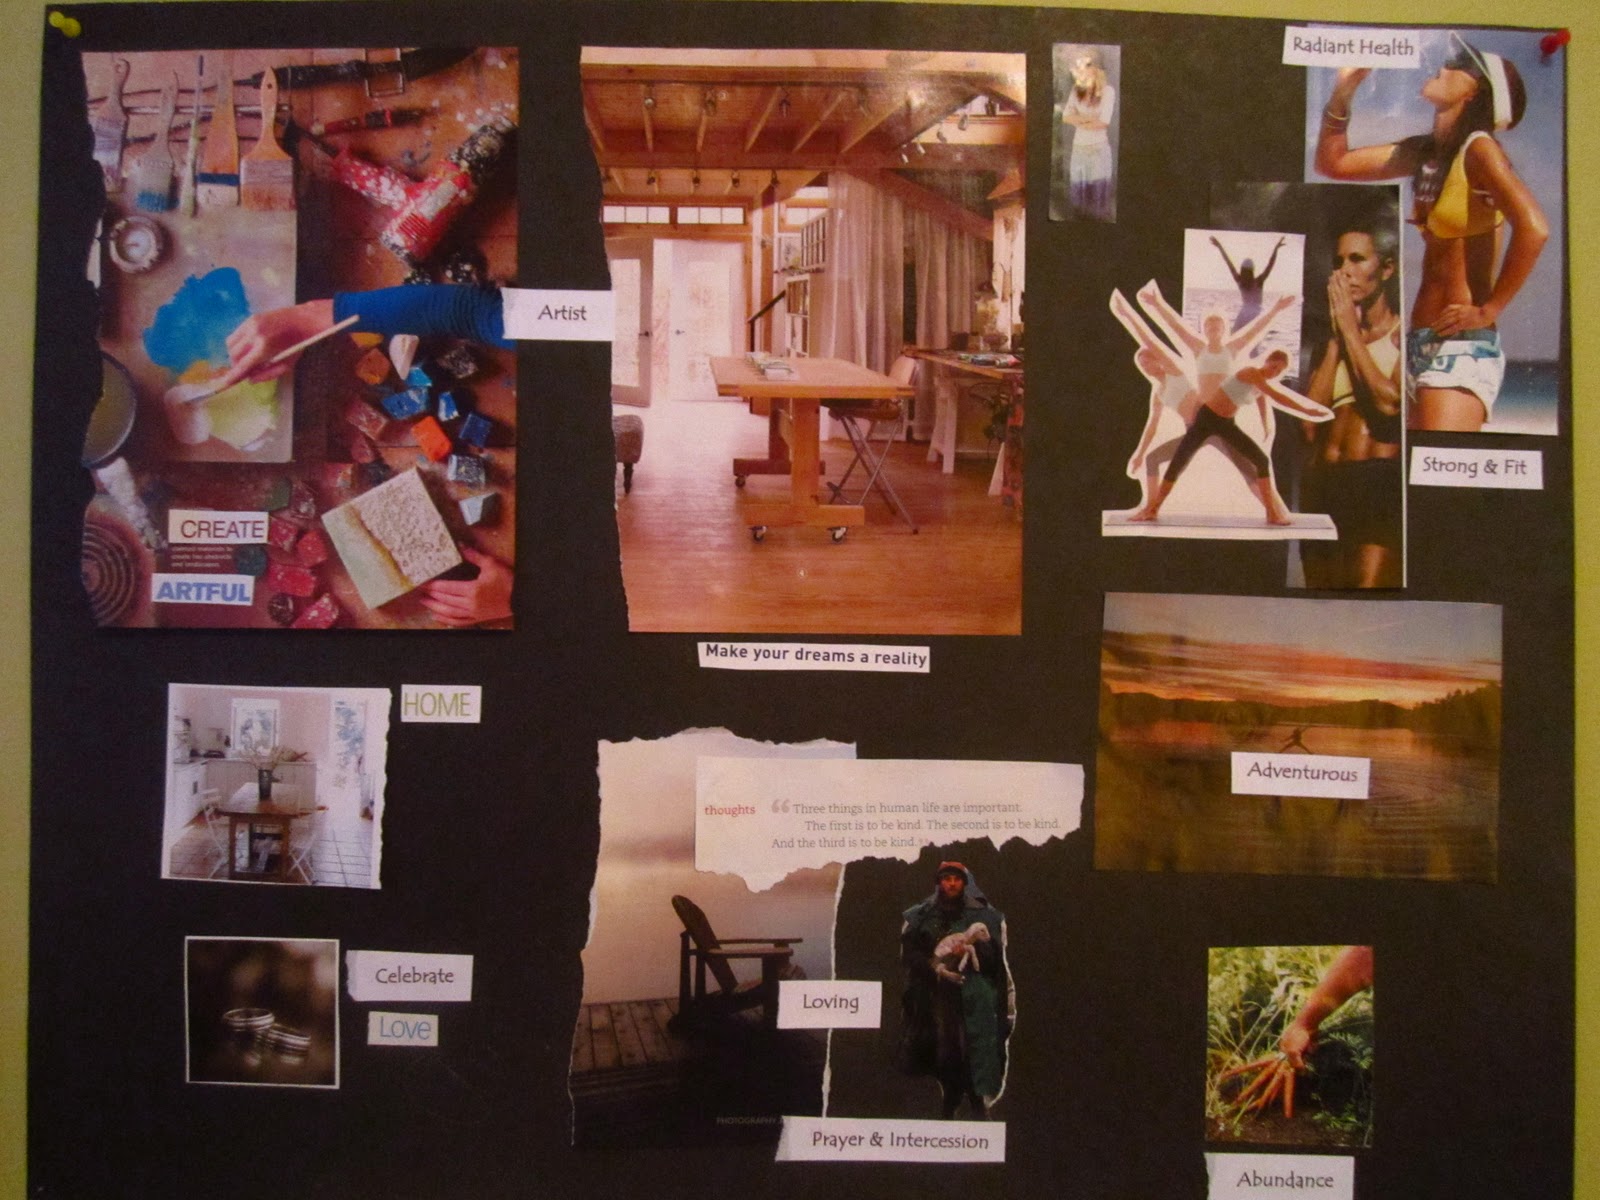
Maybe you're thinking this is some new age hocus pocus exercise. So did I in 2004 when I made my first board. I didn't even know what I wanted in life so I just chose images that were pleasing to me; a mother and her child, a woman doing yoga, some wool, photos of uncluttered interiors, and white fluffy towels along with a few words and quotations that were meaningful to me. The overall feeling of the board was serenity and simplicity.


A year or two later I felt that I needed to create another board, I still loved all of the images on the first one, they still "spoke" to me, yet I realized that everything posted on the board had come to pass, my life now reflected the board. Since then I have created three others, the most recent one having been done a few weeks ago.


This current board is much larger than my previous ones and the images reflect the situations and values that I am currently focusing on, relationships, spirituality, fitness and health, creativity etc.

Here are the basic steps to creating your own vision board:

1. I use a piece of bristol board 22"x26" and tape or glue my images on creating a permanent board (I put the date on the back).

1a. Alternatively you may use a cork board and push-pins which allow you to change and re-arrange your images as you wish.

2. Using magazines or the internet find a clip out images that represent things/situations/values that you want to create in your life. Feel free to include quotes, words etc.

3. I find it best if you don't over-think this image gathering activity. If you find any image "speaks" to you include it in your pile of images. You will evaluate and edit later.

3. Some people like to include bits of ribbon, or small objects that have meaning to them.

4. Once you have a good stack of images to work with (30-50 isn't too extreme), find a large area where you can spread out and where people and pets won't be stepping around and over you.

5. Gather your supplies, scissors, board, glue stick, tape, or push-pins.


6. Quickly go through your chosen images and make 3 piles according to how you are feeling about the pictures you have pulled. The no pile, maybe pile and yes pile.

7. Begin to cut or tear images to the size that you want and loosely arrange them on the board, moving and eliminating as you go. Don't rush yourself.

8. When you have a layout that is pleasing to your eye, step back and take another look. Then go through your maybe pile and yes pile and see if there are any images you just "have to have" on the board.

9. If you are using a cork board you can pin down your images/words.

10. If you are gluing you images, I suggest you leave the board in a safe place where it won't be disturbed and come back in a day or two. Take another look, if anything is bothering you or seems for whatever reason out of place remove it and rework the layout. You'll be looking at this board for a while; you don't want anything nagging at you drawing your focus away from the images.

11. When you are sure you like the feel and look of the board, glue down the images and put the date on the back of the board.

12. Hang your new vision board in a place that you will see it every day, take time to really soak up the images and imagine these things in your own life, picture yourself in those place, doing those activities, being the person whose life is filled with these positive experiences.

If you have any questions about the instructions listed above please e-mail me.

Thank you for stopping by My Turquoise Kettle Life today,

May today be a vision of perfection,

Sandra

Sunday 15 January 2012

In Pursuit of Passion and Purpose

Earlier this week I had the opportunity to accompany my daughter, Samantha, on an Eat Play Love puppy delivery (Eat Play Love Animal Rescue) out to the West Island of Montreal.  I was commenting on how happy I was for her that she had found her passion in rescuing abandoned dogs and cats and finding homes for them.

------------------
Here are a few of the rescue's adoptable cats.  All are vaccinated, dewormed, sterilized and looking for their forever families.
         "Minuit" - Charcoal Domestic Long Hair
"Max" - Adoptable Brown & Orange Tabby

"Tiger" - Marbled Brown Tabby


-----------------------------------
I've read a lot  about finding one's passion and purpose in life.  I've done workshops, online questionnaires, read countless articles and many books, listened to sermons, visited websites all aimed at helping people to determine what their passion and purpose might be. And still I sometimes wonder if I'm living my passion and fulfilling my purpose.

My daughter suggested that my passion/purpose maybe painting and being creative.  I agreed that I love those pursuits, but that everything I've read suggests that your passion must also be of service to people.  We were quiet for a bit.  I added that the only thing that I feel really strongly about and even frustrated over is how many people spend their lives running after things that don't matter and that in the end won't make them happy or fulfilled even if they achieved or acquired them.  I find it sad that so many have swallowed up the media's message that what they have or what they do isn't sufficient.  They don't realize that what already is, is enough.

And that's when Sam turned and gave me a little smile, "Why don't you take your own advice then?" 

"How? What do you mean?" I asked.

"Well, you are looking for something more, your passion, that you think you should be pursuing, just like the people you want to help are chasing after bigger vacations, televisions, homes and gadgets." 

Her comment really brought me to a halt. So unexpected was this insight that I actually asked her to repeat it to me a couple of times before I could fully absorb it. 

"So, what you're saying is that maybe I should continue to write my blog, sharing both my victories and failures at living more simply and authentically." 

"Yeah, and maybe you should write about this conversation." she said.

Thank you Sam, consider it done.

Thank you for visiting My Turquoise Kettle Life today.

May you find that what you have is enough today,

Sandra

Tuesday 10 January 2012

Quiet Corners

In this world without quiet corners, there can be no easy escape from history, from hullabaloo, from terrible, unquiet fuss.

Salman Rushdie


Does this quotation ring true to you? How challenging it can be to find your quiet corner of the world. Interestingly he says there is no "easy" escape, inferring that there is a way to escape the hullabaloo of the world but you may have to put some effort in to find or create it for yourself.

"Ah, finally.  My Quiet Corner"


When my daughters were little and I was working full time I had a short commute to work by car. Many mornings were a blur of lunches, school bags, arguments and often tears as I rush rush rushed my girls out the door. Sometimes as I strapped them into the car their little hands were still clutching pieces of toast that they hadn't had time to finish eating.


"What am I doing wrong??"
Once they were both safely delivered to their respective school/daycare the car became my quiet corner on wheels. After a difficult morning I would often cry, "What am I doing wrong God?" I would be filled with remorse for having been impatient or cranky with the girls. I'd vow to do better tomorrow. Often the commute was also where I could catch my breath before my work day began. I avoided using the radio and tried to use the time to be quiet, to pray and to listen. Sometimes on my lunch hour I would escape to my car again and listen to a radio program, "In Touch Ministries". I'd eat my lunch there listening to God's message of love and his promise of hope. Just that little 30 minutes of stillness and escape from the fuss of the office fed my body, mind and spirit.


These days I find it beneficial to escape into the quiet corner of my home office early in the morning. It centers me and connects my spirit to the Divine. Lately God has been reminding me that he is quite capable of handling everything and that he doesn't require my help to control situations or people. I don't need to fix everything or have all the answers or be the one doing all the doing. It’s a lesson I've learned before, but it seems that I'm on a refresher course.
"Excuse me, I'm going to my quiet corner."

Having a quiet corner is like having a good place to study; a place that is quiet where interruptions are unlikely and where my mind and spirit are freed to absorb the lesson of the day.

Thank you for visiting My Turquoise Kettle Life today,

May you find your quiet corner today,

Sandra

Friday 6 January 2012

The Winter Season


I was out taking some photos this  morning; the brittle lifelessness of the landscape  and some recent visiting to seniors' residences inspired this poem.

The Winter Season

Broken brittle branches stretch their boney arms out, reaching, longing.
She is strapped to her chair. Frozen in place, arms cast upward grasping at nothing.


Snow covered hydrangeas their withered heads swaying at the end of spindly branches.
He is hunched low in a wheelchair.  His grey head bobs rhythmically as he stares at a silent television.


Snow laden conifer branches rise and fall in the biting wind
Stooped and swaying she creeps along the corridor.


The wind blows and reveals a bit of withered grass.
I find my friend sleeping beneath a thick white blanket.


I bend to touch a frozen leaf
I reach for her hand, veined and frail.

 Ice on the ground
A tear on my cheek.


The End

Thank you for visiting My Turquoise Kettle Life today,

May you have a day that is filled with warmth and love,

Sandra

Thursday 5 January 2012

How to Refurbish a Child's Rocking Duck

Here's my latest curb-side rescue; a real ugly duckling that ended up being our Christmas gift to our little grand-daughter.  This poor guy was rescued last spring from a neighbour's garbage.  I should have taken a real "before" picture prior to getting out the red spray paint so that you could appreciate how ugly "Ugly" actually was.


He was originally bright yellow with a red seat and a navy blue beak and eyes.  He had a few rough edges which my husband sanded down.  I spray painted the entire duck with several coats of red paint, it took a lot to even begin to cover the navy blue beak and eyes.


I bought one sheet of gorgeous wrapping paper from Omer DeSerres (artist/craft shop) and a bottle of Modge Podge.  The background of the wrapping paper almost perfectly matched the red paint I had chosen and I loved the flowing floral motif.


Cutting carefully around various flowers, stems and butterflies, I was able to create shapes that suited the curving lines of the duck.


I positioned and re-positioned the cut-out flowers until I had a design that I liked.  I strategically placed the cut outs to cover the beak and eyes that were still visible through the paint. 


Using a soft paint brush I applied the flowers using the Modge Podge both under the paper and over.  I painted the entire surface of the duck with the Modge Podge so that there would be a shiny finish throughout.  I let one side dry before proceeding to the second side. I also put motifs on the inside of the duck where our grand-daughter would sit and see them.


The end result?  This once ugly duckling has been transformed into the most beautiful duck under the Christmas Tree.

Thank you for visiting My Turquoise Kettle Life today,

Wishing you a most beautiful day,

Sandra

Tuesday 3 January 2012

How to customize a tank top

While I was organizing/editing my wardrobe last week I came across a plain white tank top. I am a lover of white tanks, tees and shirts. This one however had only been worn a couple of times because it had almost instantly become wide and shapeless after laundering. I put it in the donate pile and then reclaimed it thinking that taking it in a couple of inches on each side would fix the problem and give me another shirt to wear to the gym.


While I was at the sewing machine I came across a bowl of red and white beads and began thinking... what if I just sewed some of these beads around the neckline of this tank... it could be interesting.

Measuring the front neckline I calculated how many white beads I had and how many red beads would go in between in order to create an almost symmetrical design.

Using regular white polyester thread (doubled) I began to thread the beads onto the needle, securing with a knot after each white bead and after each fifth red bead.

In about twenty minutes I had the beading complete.

I'm looking forward this year to creating some clothes that are more unique and personalized. If I come up with any fun ideas I'll be sure to share them with you. Likewise if you re-fashion anything from your wardrobe, please send me a photo and your how-to. 

Thank you for your visit to My Turquoise Kettle Life today.

Wishing you a day customized to your liking,

Sandra