Showing posts with label Sewing. Show all posts

Sunday, 16 December 2018

Beauty and Chaos


I've been working on an embroidery project recently.  The floss has become a tangled heap that I pick and tug at as I work the  pattern.  Pinterest seems aware of this chaos and regularly sends me helpful suggestions on how to neatly organize embroidery floss.

A beautiful mess
My Turquoise Kettle Life

But neatly arranged spindles of floss soldiers are not what I want right now.  There is something beautiful about this colourful and chaotic knot of thread, something unpredictable.  As I pull and remove threads, turning and tugging I am impressed with the kaleidoscope effect - one slight movement forever changing the landscape in the viewfinder.

Could there be a lesson in this tangled mess?   I generally lean toward simple, organized, predictable... I find reassurance in those places.  But life isn't predictable or simple (even when I try to keep it organized).
Maybe the truth is that even in the unknown, ever changing tangled chaos that life sometimes presents, there is a rich, beautiful mess and  that all I need to do is appreciate the beauty and welcome what I see in my viewfinder today.

Thank you for stopping by My Turquoise Kettle Life today.

Wishing you a most colourful day,

Sandra


Friday, 9 August 2013

Recycling Inspiration

A recycled bedspread creates subtle texture and colour as a cover for a bench and pillows.
S. King-Allikas
 
 
This short post is just to inspire you to think outside of the box when it comes to throwing or giving away old linens, throws, spreads etc.    I've just spent a couple of hours snipping and sewing a bedspread that my mom was giving away.
 
We have a six foot long white upholstered Ikea bench in our living room (a Kijiji find!).  I absolutely love white upholstered furnishings, but with a mud-loving dog, relaxed life style and my easy-going attitude about cleaning, I loathe taking off those Ikea slip covers and washing them. 
 
BEFORE: Ikea upholstered bench with white slip covers
 
 
My solution, thanks to my  mom's donation, was to sew two made-to-measure covers for the upholstered bench (while one is being laundered I have the other to use).  The scalloped edges  create a soft effect and with the left over fabric I recovered two pillows. 
 
AFTER: Easy clean cover and pillows
 
Now I have the beauty of white furnishings with the ease of washing nothing more than a small cover. 
 
Thank you for stopping by at My Turquoise Kettle Life.
 
May your day be covered with possibilities,
 
Sandra


Friday, 19 July 2013

Falling in love with a Fabric


A fabric store is really a visual and tactile feast; when I need to "fill the well", as author Julia Cameron of The Artist's Way explains it, I trot myself over to the fabric store and soak it all up. That's exactly where I was a couple of days ago. I didn't have any intention of buying fabric but they were having a "buy one meter and get two more free" promotion. Well doesn't that make the visit more interesting?

I always begin at the back of the store at the discount wall and work my way to the front. When something catches my eye I begin to visualize what it might become. It is like a huge buffet for the imagination. About half way through the store I found "it", a fabric so beautiful and so perfect that the ideas of where and how I could use it began to gush to the surface of my imagination like a geyser. Within minutes my mind had my entire home upholstered in this beautiful floral Waverly fabric.

Waverly floral fabric
 
I bought my one meter and got two free. I cycled home with the fabric in the basket of my bike so that I could admire it on the way. At home I discovered that I had a half meter of plaid fabric that coordinated quite nicely. Yesterday I recovered the cushions of my wicker furniture.

Here are the before and after photos:

Before:

Before reupholstery


Before: Faded and tired looking.

After:

Newly upholstered in blue Waverly fabric
 
A fresh and summery spot for relaxing
 

I still have one meter left and I've spent the morning draping it over tables, furniture, pillows and windows. Some people have theme music; I think this may become my theme fabric, the fabric of my life. In that case, perhaps I should get a few more meters.....

Thank you for stopping by My Turquoise Kettle Life today.

Wishing you a day brimming with ideas,

Sandra


Thursday, 14 March 2013

Knee Sock Bunny Craft

Yesterday I was scouring the internet looking for something different to make my grandchildren for Easter.  I found a tutorial from lil blue boo  for making sock bunnies out of women's knee socks.  The tutorial is fun and easy to follow.  In the Montreal area a great source for colourful and inexpensive knee socks are the Ardene stores.

The bunnies are quick, easy to make and so cute.


Sock Bunnies
S.King-Allikas
Each bunny took about 45 minutes to make.


Easter Bunny Craft
S. King-Allikas
 
Knee Sock Bunny Faces
S. King-Allikas
Because my grandchildren are so young, I embroidered eyes rather than using buttons so that there is no choking hazard.
 
 
With over two weeks before Easter there's plenty of time to sew up a whole bunch of bunnies.
 
 
Thank you for visiting My Turquoise Kettle Life today.
 
Wishing you a wonderful day,
 
Sandra

Tuesday, 8 January 2013

Make a Hand Painted Pillow

It's wintery and blustery and oh so chilly.  Here's an idea for making a beautiful hand painted pillow that will be comfy and add a pretty touch to a special cozy corner.


I created this painting pretty much as I would for any of my traditional paintings, so that it a truly original piece of art and signed by the artist. 

To create this project you will need.

Canvas type fabric
Acrylic paint
Paint brush or pallet knife
duct tape or masking tape
a pillow form or fibrefill for the stuffing
a sewing machine or needle and thread for hand sewing.

I think the process is probably obvious for most DIY-ers but here are some photos to guide you.

tape off area to be painted

Create your masterpiece
(don't worry the fabric will get wavy until it dries)

Let paint dry. Remove masking tape.
 
Sign your name

With right sides together, sew the back and front of the pillow
together, leaving an opening for your pillow form.
Turn, trim corners and insert the pillow form.
I made mine so that the cover could be removed for laundering.
Yes! they are washable on a delicate cycle, hang to dry.


  • If you want to make your pillow cover washable you will have to "set" the paint.  Once the paint is fully dry, place it on your ironing board.  Cover the painted area completely with an old tea towel or piece of cotton fabric.  Iron on a high setting for about 20 seconds.  Remove the tea towel and let cool.

Let your imagination run wild, or coordinate your colours to your decor.  With some supervision, even your children can create a pillow for their room or to give as a gift.

Thank you for stopping in at My Turquoise Kettle Life today.

Wishing you a pillowy-soft kinda day,

Sandra


Sunday, 9 December 2012

Baroque.... Without Going Broke

In yesterday's edition of the Montreal Gazette, there is a large feature on baroque inspired fashion, ornate, glitzy, gold and just in time for the holiday season.  I thought it would be fun to have a really stunning piece to wear over the Christmas holiday, but I didn't want to buy something from the mall and bump into the obviously identical outfit at an event.  Nor did I want to spend a lot of money on something that is going to be "in" this season and "out" within a couple of months.


Inspired by the photos I visited a local thrift store at opening time this morning.  After about fifteen minutes I had found it!  A gold embroidered evening jacket.  With a few alterations it would be a perfect fit.  It screamed 1980's or 1990's with it's heavy shoulder pads and little "pouf" in the breast pocket.  All very fixable however, and at $5.99 worth a try.


Thrift Store Find
Metal and crystal buttons


Once I got it home I opened up the lining at the shoulder seams and did a shoulder pad-ectomy.  Next step was to remove the sewn in pocket "pouf".  I tried the jacket on again and pinned in the side seams about 1.25 inches down each side.

Opend shoulder seams to remove shoulder pad
With the shoulder pad removed, the fit is softer and more natural.


I thought I'd wear them with some slim fit black pants, put then tried pairing the jacket with a little black dress, black stockings and heels.

It's holiday-perfect; one-of-a-kind, touch of baroque without going broke!

Thank you for visiting My Turquoise Kettle Life today.

Wishing you a resourceful day,

Sandra


Friday, 31 August 2012

Felt Baby Boots - Design by Clare Youngs

Last night I was poking around our local library when I found Clare Youngs' "Scandinavian needlecraft, 35 step-by-step projects to create the Scandinavian home".  Click here for book information.

Clare's felt baby boots are just so adorable, and with a new grandchild on the way, I couldn't resist.  This morning I walked over to the fabric store with book in hand and found everything I needed. A couple of hours this afternoon spent cutting, embroidering and sewing and the booties were done. 

Felt Baby Boots design by Clare Youngs


Embroidered felt baby boots Clare Youngs design
The Clare Young's book has great photos, easy instructions and includes tips and notes on sewing and embroidery. 

With so many beautiful projects, I think I may have to re-new this library book a few times before I'm done.

Thanks for stopping in at My Turquoise Kettle Life today.

Wish you a beautiful day,

Sandra


Thursday, 10 May 2012

How to make a toddler's sundress from scraps of fabric

This week my creativity is pouring out all over the place, writing, decorating, photography, mosaic work, painting and sewing.  Today I want to share with you a simple way to use up remnants of cotton fabric to make cute little sundresses.

This is a simple sundress pattern that fits my 20 month old granddaughter who weighs about 30 pounds. 

sundress made using 3 types of fabric


I used two different fabrics for the bodice and pieced together panels of alternating patterns and widths for the skirt.  I used ribbon for the shoulder ties so that the dress can "grow" along with her. I think the result is cute and of course its one-of-a-kind!
right side of bodice - two coordinating fabrics

sundress skirt - 3 fabrics of varying width panels pieced together

bodice attached to gathered skirt


Here is the same dress pattern made out of a single type of fabric.  This time I made matching shoulder ties and put a little lace trim around the hemline.
sundress with matching shoulder ties

lace hem detail
sundress with matching shoulder ties

The pink dress sewed up in about 75 minutes. 

Here is the pattern I drew to make the bodice (cut 4 as the bodice is lined). 
There isn't a pattern for the skirt, its just 15" long and 2 1/2 times the width of the bottom of the bodice or approximately 60" wide. The ribbons or ties are about 10" long.
If you are new to sewing this may not be enough instruction... feel free to e-mail me at sandra.myturquoisekettlelife@gmail.com and I will do my best to answer your questions.


Thanks for visiting My Turquoise Kettle Life today.

Wishing you a day that is sew wonderful,

Sandra


Tuesday, 3 January 2012

How to customize a tank top

While I was organizing/editing my wardrobe last week I came across a plain white tank top. I am a lover of white tanks, tees and shirts. This one however had only been worn a couple of times because it had almost instantly become wide and shapeless after laundering. I put it in the donate pile and then reclaimed it thinking that taking it in a couple of inches on each side would fix the problem and give me another shirt to wear to the gym.


While I was at the sewing machine I came across a bowl of red and white beads and began thinking... what if I just sewed some of these beads around the neckline of this tank... it could be interesting.

Measuring the front neckline I calculated how many white beads I had and how many red beads would go in between in order to create an almost symmetrical design.

Using regular white polyester thread (doubled) I began to thread the beads onto the needle, securing with a knot after each white bead and after each fifth red bead.

In about twenty minutes I had the beading complete.

I'm looking forward this year to creating some clothes that are more unique and personalized. If I come up with any fun ideas I'll be sure to share them with you. Likewise if you re-fashion anything from your wardrobe, please send me a photo and your how-to. 

Thank you for your visit to My Turquoise Kettle Life today.

Wishing you a day customized to your liking,

Sandra

Friday, 9 September 2011

How to customize a cardigan sweater


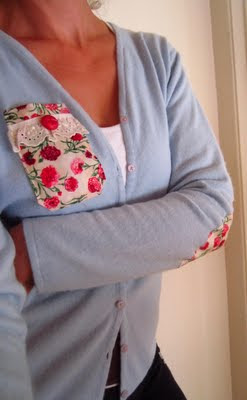
Someone recently passed along a pretty blue cardigan sweater to me.  I loved the colour but the sweater was a little loose.  Today I tried it on again and decided it needed to be taken in a good two to three inches along the sides.    

Once I had it fitting properly I still wanted to “fix” it somehow.  I decided to give it elbow patches in a feminine floral pattern.  I used an oval dish as a template, turned under the edges of the patches, pressed them and using a zigzag stitch, sewed them onto the sleeves.  

Thinking that the front also needed to be dressed up, I used the same fabric to cut a small pocket, trimmed it with lace, a vintage button and voila!  A one-of-a-kind cute little cardi!
Front

back with elbow patches
pretty, feminine and unique


Passing along clothing to a friend or relative is a great way to "recycle" and economize.  Use your imagination (and your sewing machine) to make the "new-to-you" clothing uniquely "you".


Thank you for stopping by My Turquoise Kettle Life.


Wishing you a creative day,

Sandra